How to Brew Kombucha
/
How to Brew Kombucha
Let's talk 'booch!
I have only been brewing since August 2016 but since then, I have accumulated many a SCOBY. So many, in fact, that I am housing them in two "SCOBY hotels" ( yes, this is the actual term for it). I've just recently given some away and it triggered a memory of the very first time I had gifted someone a small starter jar. Let's call her J.H. J.H. was terribly nervous about brewing. She would email me with questions from how to transfer her starter jar home, to whether or not raw cane sugar was okay to use.
SCOBY Hotel: No Vacancy. Time for sharing!
Now, I'm no expert, so giving her advice was a scary thing for me. I've had some great batches, some questionable batches, and certainly some not-so-great batches. I’ve had mold on a SCOBY before and it was disheartening because when that happens, you have to pitch it. --Brewing takes a great deal of time and patience!
J.H. continued to email me questions and I continued to reassure her while peppering in some advice. Surprisingly, I had walked J.H. through a successful brew, according to her email subject line, "SUCCESS (!!!!)". That felt awesome (and relieving)!
My point is, set your worries aside (though, I should follow that advice). Kombucha brewing is not a new thing and it is relatively easy once you get it going. There are various resources online, in literature, and elsewhere. Sandor Katz is an excellence resource, Kombucha Kamp, is another. I personally like to refer to one of my favorite blogs, The Kitchn. You can rest easy knowing that most people who first start brewing are “flying by the seat of their pants”! It is truly trial and error. Though the technique is easy to acquire, I'd love to share my How-To's with you!
First off, WHAT in the heck is kombucha??
Kombucha starts out as a sugary, sweet tea, which is fermented with the aid of a scoby. "SCOBY" is an acronym for "symbiotic culture of bacteria and yeast." The scoby bacteria and yeast eat most of the sugar in the tea, releases carbon dioxide, and in turn, leaves you with a beverage that is refreshing, fizzy, and slightly tangy. On top of all of that, it is relatively low in calories and sugar.
Hold up. Bacteria?? Ew! Let’s clear the air here. Scobys contain good bacteria (aka, beneficial bacteria). There are around 100 trillion good bacteria that live in and on our bodies (thanks, Humm Kombucha). Many of these bacteria live in our gut. They help our bodies break down food/absorb nutrients, boost our overall health, and are essential to our survival. One of the most well-known types of good bacteria is called probiotics. Lucky for us, kombucha is full of happy probiotics! There are various claims that kombucha “cures” ailments such as arthritis, depression, and heartburn as well. Since our bodies are all vastly different, there is no way to disprove of these claims.
So...scobys….yes, they're a little alien and booger-y but you can easily look past all of that when you remember the multitudes of health benefits it provides!

Layers and layers of scoby. Might have overdone it that year.
Brewing
If you are wary to begin, no worries! That’s completely natural. One thing that has reassured me was knowing that in this ancient practice, people who brewed before us probably had much dirtier environments and they brewed just fine. These days we are much more careful. So, if they can do it we can, too!
What You’ll Need (from The Kitchn):
- 3 1/2 quarts water
- 1 cup sugar (regular granulated sugar works best)
- 8 bags black tea, green tea, (or 2 tablespoons loose tea)
- 2 cups starter tea from last batch of kombucha or store-bought kombucha (unpasteurized, neutral-flavored)
- 1 scoby per fermentation jar, homemade or purchased online
- Optional flavoring extras for bottling (such as 1-2 cups of chopped fruit, fresh herbs or spices, fruit juices, honey, etc.)
Equipment
- Stock pot
- 1-gallon glass jar or two 2-quart glass jars
- Tightly woven cloth (like clean napkins or tea towels), coffee filters, or paper towels, to cover the jar
- Bottles: Six 16-oz glass bottles with plastic lids, swing-top bottles, or clean soda bottles
- Small funnel
Directions
Note: Avoid prolonged contact between the kombucha and metal both during and after brewing. This can affect the flavor of your kombucha and weaken the scoby over time.
- Make the tea base: Bring the water to a boil. Remove from heat and stir in the sugar to dissolve. Drop in the tea and allow it to steep until the water has completely cooled. Hot or warm tea could disrupt the scoby environment and you could end up with a bad batch.
- Add the starter tea: Once the tea is cool, remove the tea bags or strain out the loose tea. Stir in the starter tea. (The starter tea makes the liquid acidic, which prevents unfriendly bacteria from taking up residence in the first few days of fermentation.)
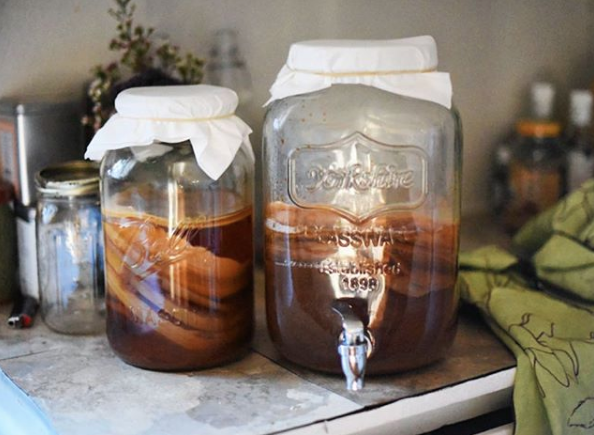
- Transfer to jars and add the scoby: Pour the mixture into a 1-gallon glass jar (or divide between two 2-quart jars, in which case you'll need 2 scobys) and gently slide the scoby into the jar with clean hands. Cover the mouth of the jar with a few layers tightly-woven cloth, coffee filters, or paper towels secured with a rubber band. (If you develop problems with gnats or fruit flies, use a tightly woven cloth or paper towels, which will do a better job keeping the insects out of your brew.)
- Ferment for 7 to 10 days: Keep the jar at room temperature, out of direct sunlight, and where it won't get jostled. Ferment for 7 to 10 days, checking the kombucha and the scoby periodically.
It's not unusual for the scoby to float at the top, bottom, or even sideways during fermentation. A new cream-colored layer of scoby should start forming on the surface of the kombucha within a few days. It usually attaches to the old scoby, but it's ok if they separate. You may also see brown stringy bits floating beneath the scoby, sediment collecting at the bottom, and bubbles collecting around the scoby. This is all normal and signs of healthy fermentation.
- After 7 days, begin tasting the kombucha daily by pouring a little out of the jar and into a cup. When it reaches a balance of sweetness and tartness that is pleasant to you, the kombucha is ready to bottle.
- Remove the scoby: Before proceeding, prepare and cool another pot of strong tea for your next batch of kombucha, as outlined above. With clean hands, gently lift the scoby out of the kombucha and set it on a clean plate. As you do, check it over and remove the bottom layer if the scoby is getting very thick.
- Bottle the finished kombucha: Measure out your starter tea from this batch of kombucha and set it aside for the next batch. Pour the fermented kombucha (straining, if desired) into bottles using the small funnel, along with any juice, herbs, or fruit you may want to use as flavoring. Leave about a half inch of head room in each bottle. (Alternatively, infuse the kombucha with flavorings for a day or two in another covered jar, strain, and then bottle. This makes a cleaner kombucha without "stuff" in it.)
- Carbonate and refrigerate the finished kombucha: Store the bottled kombucha at room temperature out of direct sunlight and allow 1 to 3 days for the kombucha to carbonate. Refrigerate to stop fermentation and carbonation, and then consume your kombucha within a month.
- Make a fresh batch of kombucha: Clean the jar being used for kombucha fermentation. Combine the starter tea from your last batch of kombucha with the fresh batch of sugary tea, and pour it into the fermentation jar. Slide the scoby on top, cover, and ferment for 7 to 10 days. (Start the process again. See step 5).
I’ve never used raw cane sugar for my brews before but I tend to not use “raw” anything during the first phase of brewing because the main concern about using raw sugar or raw honey is that it can contaminate your brew with “bad bacteria” and make a dangerous concoction. Your brew is trying to cultivate “good bacteria” in the first stages of kombucha brewing. If there is a large colony of good bacteria forming, chances are, the good bacteria will fight off the bad. Feel free to experiment with raw cane sugar or honey during the second ferment stage, though!
You will know if you have ruined it if it starts to smell “off”. If you are familiar with the smell of fermenting brew it should be a little sour-smelling, kind of vinegary—even like stinky feet! If it starts to smell foul or if it has mold on the surface, pitch it immediately. Again, that is the work of bad bacteria—which you don’t want.
A good tip is to use purified drinking water. I used tap for my very first batch and I think something went wrong. The scoby and everything seemed fine but when I drank it, it gave me a funny feeling—maybe it was all in my head but I didn’t feel comfortable continuing so I pitched it. I believed it might have been because of the contaminants in tap water. Purified drinking water changed everything. It doesn't have the extra additives in it and the result is a clean and true-tasting brew. Another tip is to use ALL ORGANIC EVERYTHING (my Co-op does a great job providing me with ingredients I can count on). It’s best to use clean, real ingredients. When you are fermenting, you want to have the “good stuff”.
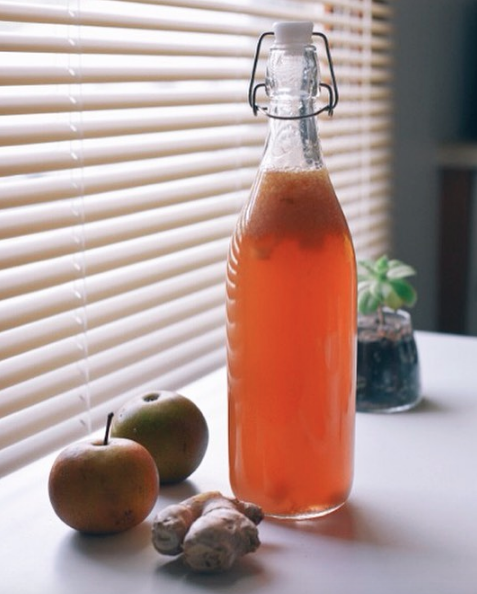
I add fruits and herbs! My favorite herb is mint! So fresh :) I’ve brewed batches with beets, aronia berries, ginger, and asian pear. My favorite combination currently is raspberry mint—it’s definitely a more summery flavor.
Good luck & happy fermenting!